5) Setting your finished
Character map to active.
Now that you've created
your Character Map, click
the OK button at the bottom
right of the “Edit Character
Map” palette. You should
now see the name of your
new Character map in the
right column (available) of
the “Character Maps” palette. To see your Character Map in action, simply left click and drag the name
of your Character map from the right column to the left column (active). You should see the character
map have immediate effect in the Canvas if you have an animation selected which uses images which
you've “effected” with your Character Map.
Note: This new look for your character will even be reflected if you export animations as PNG images
while Character Maps are active.
6) Stacking Character
Maps for advanced uses.
You can create as many
Character Maps as you'd
like, and make each one
handle specific changes to
your object or character.
For example, you could
have one set of Character
Maps called “blue pants”,
“red pants”, “Bermuda
shorts” ect which all swap out the original pants images with alternate images to change your character's
pants. You can then have a similar set of Character Maps to handle changing the characters shirts.
Finally you can have other Character maps that reveal or hide the character's sunglasses, baseball cap etc.
Once all these character maps are finished you can “stack them”, meaning make more then one of them
active at a time to simultaneously change the entire wardrobe/equipment set of a character to any of
countless possible combinations! Spriter plug-in's for most authoring systems will support this
functionality at run-time, so you'll be able to make games which can combine Char-Maps on the fly based
on player decisions and actual game situations.
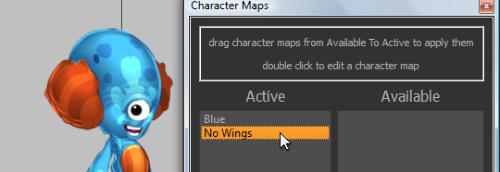
See how in this example, I'm using one Character Map to change from the red character to the blue, and a
second character map to hide the wings.
Activating and Stacking Character Maps
Spriter Pro User’s Manual version 1.4